Tuesday, January 1, 2013

Oops: Ditching the V8 for Sugar Cookies

So, I got so busy yesterday that I really did not have the time for experimenting with a V8 recipe in the Vitamix.  As we were rushing out the door to a play date (very rare, only occurs when I'm on vacation I assure you) I opted for a quick orange-pineapple Julius!  (Pineapple, clementines, honey, vanilla, and a splash of whole milk).  I was, however, able to clear a short time in my morning to mix up a batch of sugar cookie dough I got from the KITCHN (http://www.thekitchn.com/recipe-best-cutout-cookies-38629).  If you don't know about The Kitchn, it's an offshoot of AT/Apartment Therapy and well worth your time.

I, always the tweaker and breaker of rules, cut the recipe into thirds, and added my own combo of spices (vanilla, lemon, cardamom over the vanilla, lemon, almond combo).  Always in the rush that I am, I thought I'd leave everyone hanging with a quicker "teaser" pic.  Sorry for the lighting, my only photo editing occurs in Microsoft PAINT (gross!!!!).

I *did* roll out the dough and bake the cookies...just waiting to decorate them now.  Maybe tomorrow.  My first day back to WORK.  Ugh!  Ugh! Ugh!


XOXO

Sunday, December 30, 2012

DIY Tutorial: New Year's Eve Swizzle Sticks!!

Wow, has it been a LONG time since I've posted (!)  Here is a DIY Swizzle Stick Tutorial to break in the New Year!

I actually came up with this when I was rummaging through the Xmas clearance at Target like a little old lady.  I found a set of "swizzle sticks" half off at $2.50 for a set of 10 or 12, can't really remember.  They were cute, but...way too short, they would have made better cupcake toppers than swizzle sticks for a drink.  Plus, you could see the hideous clear rubber bands which were used to fix the tinsel on the stick.  PASS!  

I instead picked up a tinsel garland and a pack of bamboo skewers.  I had shorter ones at home but decided the longer skewers would make for more whimsical swizzles/cupcake toppers/*wands*...I have no intention of using these on New Year's, however they DO fit the bill:  sparkles.  (I'm saving mine for a UNICORN-themed birthday party.  Not mine, obviously...my little girl's  ;c) 
 I simply cut approximately 1-cm-long pieces of tinsel, folded in half around a gob of hot glue on the end of each skewer.  On some, I started with a piece of star-tinsel decorative wire wrapped around the skewer, secured by a ring of glue before added the tinsel pouf via the "gob-and-go" method.  Haha.  

I trimmed the hot glue wisps off for a more finished look.


My materials and approximate costs are listed below:


Tinsel: Target, $3, *xmas clearance*

Wire garland:  Target, $1-2, *last year's xmas clearance*

Bamboo skewers (long): Target, $1.69 (already had the short ones)

Glue gun: Home Depot, $4.97

Glue sticks: Home Depot, $5.46

As you can see, this one is pretty much a NO BRAINER.  Hopefully, even a busy mom *with* a full-time job can pull these little suckers off.  Yes, by the way, I AM cheating.  I may have a full-time job, however my wonderful (?) company has given me over a week off of having any professional responsibility (I return to the daily dredge on Wednesday!) so I happen to have some time on my hands to craft and share my way-out-there musings with others.  Let's see if this crafty/bloggy part of my life can survive even after my return to work.

*fingers are double crossed*

I am finishing this post up after a stomach-churning meal at Sizzler with the husband's family.  They all seem to enjoy it, but I swear, that place is like the poison-acid trip from down under for my stomach.  It's really no better than a school lunch, and for someone's whose stomach is accustomed to more delicate, well-balanced and "organic" foods...well, let's just say the knot in my stomach won't go away without a trip to the bathroom in the morning.  lol.  Sorry Sizzler, not trying to tarnish your good name.  You just screw with my insides in the worst way!!  

Anyway...I am planning to blog a detoxifying V8 Vitamix concoction tomorrow to help ease my stomach pains.   Yippee!!!


XOXO


Saturday, June 9, 2012

My New Thrifted Closet System

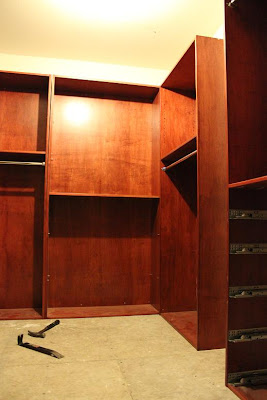
Earlier this week, the husband brought home a huge set of *real wood* closet shelves/drawers.  He and his sister split the closet system, which came from her boss's beach house on Fox Island.  I think he is some sort of cosmetic surgeon.  The system originally cost just under ten grand to purchase and install, but his wife wanted to switch it out for something different.  Good for you lady, put that man to work!  ;-)

Anyway, because our house and his sister's, we were able to fit most of this closet system into our walk in closets.  YEAH, I know, right?!  I wanna say this "beach house" is probably more like a beach Mansion!

So...last night Chad worked on fitting it all together how he wants it.  This weekend, he is going to build a base to lift the system about 7 inches, and also install molding at the top so it takes on the floor-to-ceiling-built-in look.

See the LEFT view, and RIGHT view (as best I could take the pictures, as I did not want to step into the disaster of a bathroom just behind me):
 And of course, the Grand Central view:
It's pretty apparent in the first view that the "light fixture" may just be a simple bulb on a dangling plate...LOL.  I would like to replace it with a cute, easy to clean fixture.  I like the idea of the EDEN pendant from CB2, but this is already in the attached master bedroom - so the light in the closet should probably be smaller, or different in its design.
I actually have this light in my daughter's room as well.  It is VERY well priced at $49.95 + $4.95 flat rate shipping.  Ceiling plate not included however.  We used this Conversion Kit from West Elm, in chrome.   It is $15, but we got it during a blanket Lighting sale, so I believe paid a little over $10 - we bought quite a few.  They are nice to have around since no other retailer offers this product to fit with modern interiors.  


I have been eyeballing the Black Iron Pendant from World Market, which shows $89.99 online, but I swear I saw this, or something very similar, on clearance for half the price in the store!  This may be a little too dark for a closet done up in dark cherry, however, the interior looks like hammered gold.  So maybe it would work?  
Or maybe that is my inner artist trying to convince herself to buy something based solely on its beauty - and not based on whether or not it would "work" in its intended space!


I should probably keep looking!  Probably will hit up Ebay for vintage milk glass pendants, Jetsons style  ;-)


Well, this is all for now.  I should get my bum out of this coffee shop before my husband suspects I have gone out for a good time after a long morning consisting of stops at the DMV, Vehicle Licensing (2 different places in this state), and the sweaty gym!


XOXO.


Friday, June 8, 2012

Amaretto Sour with REAL Juice

Yes, a return to my ever popular Tortellini Soup (well, at least popular at MY house)!  This bowl has spicy chicken sausage pieces, and baby carrots instead of cut carrots...because it is what I had.


I think I had this bowl of leftover soup a few Thursday's ago, and, due to a rash decision, I also made myself an Amaretto Sour to go along.  


Now, I am a firm believer in avoiding all corn-syrup-based anything, so I never bothered to purchase the sour mix.  Instead, I created this drink via the following recipe:


All-Natural Amaretto Sour
1 part Amaretto (I used Disaronno)
1 part lime juice (pulp and all - no need to put in the extra effort to strain it out)
1 chunk of pineapple (to stir, of course!)


If it is too sour, just add a little splash of Amaretto in.  Some use grenadine, but I am afraid that might be too sweet for me...?  However, I plan on making these tonight and experimenting with lemon juice and a bit of grenadine anyway - for the sake of trying it all  :-)


WARNING:  most Grenadines DO contain corn syrup.  If I come across an easy recipe for Grenadine, I will definitely be trying to make it at home!

ENJOY!
XOXO.


Sunday, June 3, 2012

My Tortellini Soup and Editing Frustrations...

Last week, I made tortellini soup.  I made it this week as well.  I have been using a dry, cheese-filled tortellini pasta which I purchase at Costco.  I like it JUST FINE on a plate with simple Alfredo or marinara sauce, however the husband is not a big fan of it...until I put in in a soup!  I also like the soup, so it is a WIN-WIN.


I had originally planned to do a post on the easiness of this dish by superimposing a bullet-point list of the ingredients on top of the image:

Broth
Lentils
Carrots
Onions
Spinach
Parmesan
Spices

My intent was to exclude any measurements because all I ever do when preparing this soup is EYEBALL it...or I use whatever amount or FORM of any ingredient which I find lying around.  For example, I either use a can or two of chicken broth, or mix chicken bouillon with water (TO TASTE).  I might use powdered Parmesan or shredded, or drop the Parmesan all together and use Pecorino~Romano.  I prefer fresh minced garlic, however occasionally use fresh crushed or garlic powder to save time.  I actually forgot the garlic the last two times I prepared this soup, and it was just fine!  Last week, I tried chopped carrots.  This weekend, a couple bags of single-serving baby carrots (I just bought another box of these from Costco so was trying to use up my old ones).  

Sometimes I add a diced tomato and/or tomato paste - especially if I am trying to use up the last bit of leftover ingredients from a past meal. Here are ways to "mix-it-up" with your soups:


diced tomato
tomato paste/sauce
chili oil or red pepper flakes
sausage chunks!
corn
kale
celery
peas
saute garlic/onions/tomato in olive oil before adding broth
bay leaves!
cloves
swap out cheeses


THE POINT BEING:  On a weeknight, (or any night for that matter?!) who needs measurements?  As long as it's quick, healthy, tastes good, and utilizes what you have on hand, it's good!!  Just remember, *to taste* is the key here.  If you are the type of cook who relies on measurements, when you try cooking without your measuring cups (saves on dish!  yay!!!) you should always taste as you go.  Don't over-salt-and-pepper your meal!

SO, MOVING ON...I thought I would be all cute and write my ingredients over image.  I know NOTHING about editing software, so I use paint.  Plus, this is sometimes my "lunch hour gig" at work, and Microsoft Paint is all we have.  We cannot bring our home computers to work, so no point in buying a fancy program for my laptop to bring with me.

See below for my FIRST attempt, I took a .JPG image, and saved as a .JPG image.  But the writing blurred!!! 
 On my next attempt, I tried saving as a .GIF, but that degraded the image quality - it looks like it was printed in a cheap newspaper (please click on the image to get the full cheapened effect...):
Then I tried saving in .TIF and .PNG, and I think got the desired effect FOR NOW. (By the way, the color difference in text across these images is intentional, I was experimenting with these shades of pink).

.TIF file:

.PNG file:
 I still notice a little bit of blurring around the word "YUM", but these two formats keep the quality degradation to a minimum.  Now I just need to find some time in my life to find out what sort of editing programs all the other food/fashion/fun bloggers are using to incorporate text on top of their images.  

Well, that's it for now, I hope you enjoyed my approach to easy cooking and comical view of a poorly-tech-savvy blogger's attempt to edit her images.


Until next time, XOXO.

Saturday, June 2, 2012

Bread Pudding from Apartment Therapy!

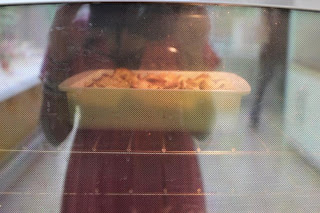
A couple weekends ago I made amazing bread pudding using a recipe I found at The Kitchn on Apartment Therapy.  I DID tweak the recipe a bit by adding a tablespoon of Knob Creek BOURBON (I've been calling it Rum all this time...) into the liquid mixture.  I also made a caramel sauce with cardamom to go on top.  It was for our neighbor's birthday down by the creek!  I liked my bread pudding so much I made it again last week...you will have to excuse the stains on my oven window...  ;-)


Monday, May 28, 2012

More Thrifting: Vintage BKF Butterfly Chair for Kitty?

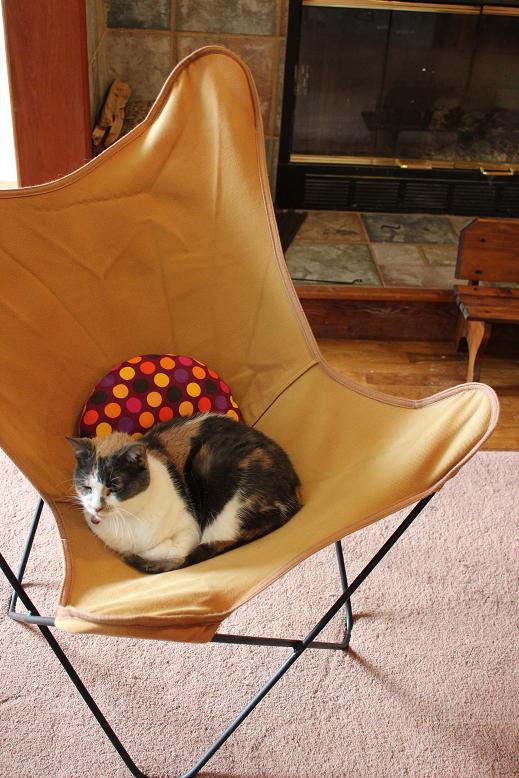
Look what I scored on Craigslist from a very nice lady in Silverdale?!  A truly vintage Butterfly Chair (complete with faded cover)!!  Not sure who has made this, as there are no markings to be seen.  However, I am SO happy this isn't one of those HIDEOUS knockoffs that has a bunch of stupid connectors at the intersections of the wires.  This baby is WELDED together...


AS IT SHOULD BE.


Yes, I know...the wrinkles are actually my fault.  I let the cover sit in the dryer too long.  I was too excited to put it to use to iron the wrinkles out.  I just KNEW this would be an excellent chair for the Kitty cat.  I picked it up yesterday...upon waking this morning, I caught little Miss. Kitty lounging in the butterfly!  See how curled-up-comfy she looks...?


Of course, she lost interest in my and the camera PRETTY quickly when she decided it was time to return to her napping with a very obvious YAWN.  Translation:  "be off with you, Human!  Leave me to my beauty sleep!"

Leave her alone I did.  


Although I would like to replace this with a leather sling, I plan on starting out with a Mongolian sheep's wool throw or lumbar pillow, plus a little round pillow in either jet black or an eye-popping color.  I am leaning towards the black because I have SO much color going on in this room it's ridiculous!

XOXO.